Funds
This page presents the configuration and usage of the Funds addon for ClientXCMS. Objective: allow customers to credit their balance (pre-payment) and, if you allow it, transfer funds to other accounts.
1. General Principle
-
Account Credit
- The customer chooses an amount (within the allowed range) and pays via their chosen payment gateway.
- The ClientXCMS Balance is immediately updated after payment validation.
-
Fund Transfer (optional)
- If enabled, a customer can send all or part of their balance to another account.
- Rules (delay, minimum, maximum, prior deposit) prevent abuse.
-
Tracking & History
- Administration table to trace all transfers.
- "Payment Methods" page on client side with detailed history.
2. Prerequisites
Once the extension is activated:
- Administration → Settings → Extension Settings → Funds
- Transfer management: Administration → Settings → Extension Settings → Funds (Transfers tab)
| Element | Detail / Version |
|---|---|
| Add-on | Funds (free, core) |
| Gateway | At least one active gateway (Stripe, PayPal, etc.) |
| Client Role | "Add / transfer funds" authorization (enabled by default) |
3. Global Settings
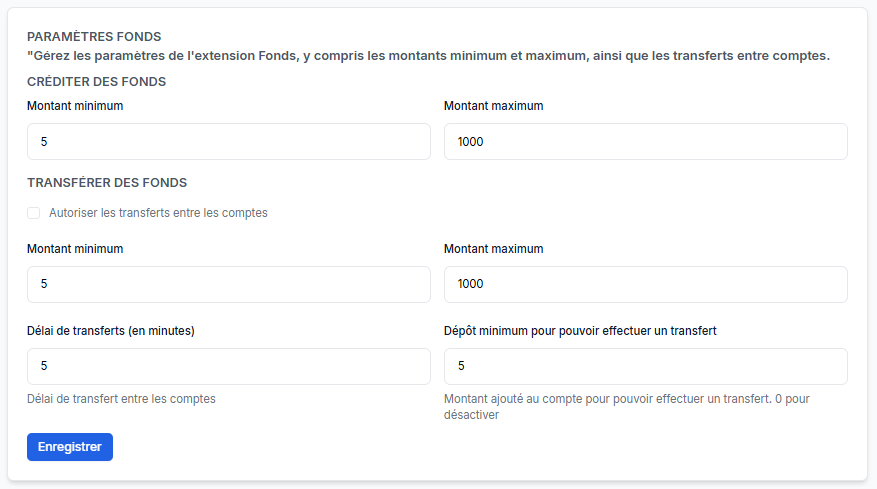
| Section | Field | Function | Example |
|---|---|---|---|
| Credit Funds | Minimum / maximum amount | Limits for a single deposit | 5 · 1000 |
| Transfer Funds | Checkbox "Allow transfers" | Enables or disables the feature | ✅ / ❌ |
| Minimum / maximum amount (transfer) | Allowed range for a transfer | 5 · 1000 | |
| Transfer delay (minutes) | Anti-spam between two transfers from same client | 5 | |
| Minimum deposit required | Balance to credit before being able to transfer | 5 (0 to disable) |
Amounts follow your store's main currency.
Click Save to apply.
4. Transfers Table (administration)
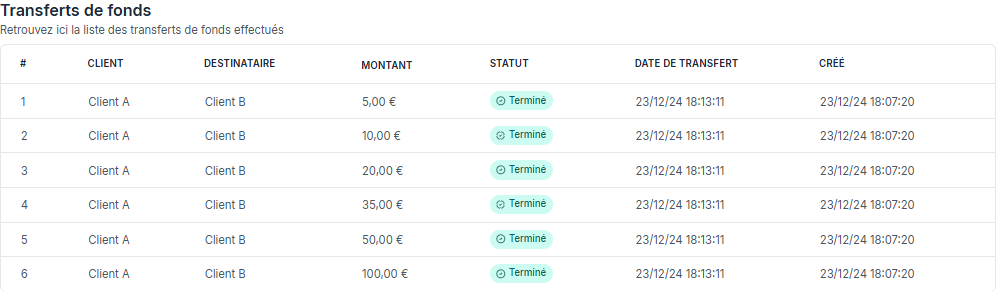
- #: internal identifier
- Customer / Recipient
- Amount
- Status: Completed / Pending / Cancelled
- Transfer date
- Created: request date
Use standard filters (date, customer, status) for your audits or disputes.
5. Credits and Transfers on Client Side
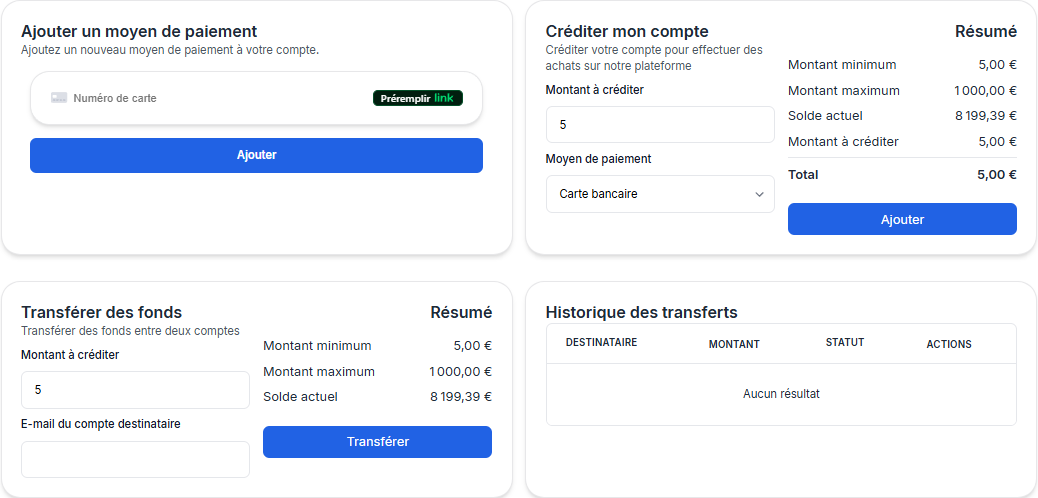
My Account → Payment Methods
5.1 Credit My Account
- Enter an amount (between min & max).
- Select the payment gateway.
- Validate: balance is updated after successful payment.
5.2 Transfer Funds (if enabled)
- Enter the amount and recipient's email.
- Check the summary: limits, balance, remaining delay.
- Click Transfer.
- The recipient instantly receives the credit and a notification email (if enabled).
A table summarizes Transfer History (status + possible actions, e.g., cancellation while Pending).
6. Best Practices
- Balanced limits: set min/max consistent with your rates to avoid costly micro-payments or overly high deposits.
- Anti-fraud: maintain a few minutes delay between two transfers and require a minimum deposit before any transfer.
- Support: keep the transfer ID for any complaint.
- Communication: specify in your terms that the balance is non-refundable (if that's your legal choice).
- Logs: regularly check the transfer list to detect any anomalies.