Upgrade
The application is regularly updated to fix bugs, add new features, or extensions.
Cloud
Cloud updates are automatic. You don't need to do anything, the application will update automatically.
Self-hosted
Self-hosted updates are manual. You need to replace the application files with the new ones.
warning
We recommend making a backup of your application and database before starting an update.
To update ClientXCMS, choose one of the methods below: downloading the release (archive), updating via Git, or via the administration interface.
- Archive (release)
- Git
- Automatic
- Download the latest release from GitHub and save it as
clientxcms.zip:
curl -L -o clientxcms.zip "https://github.com/ClientXCMS/ClientXCMS/releases/latest"
- Put your application in maintenance mode:
php artisan down
- Extract the archive and replace the files:
unzip clientxcms.zip -d /var/www/clientxcms
mv /var/www/clientxcms/ClientXCMS-*/* /var/www/clientxcms
rm -r /var/www/clientxcms/ClientXCMS-*
- Install dependencies and run migrations:
composer install --optimize-autoloader --no-dev
php artisan migrate --seed && php artisan clientxcms:db-extension --all
- Clear caches and rebuild assets:
php artisan cache:clear
php artisan view:clear
php artisan route:clear
npm install && npm run build
- Exit maintenance mode and run post-update hooks:
php artisan up
php artisan clientxcms:on-update
- If you installed your instance via Git, you can update by pulling the remote branch:
cd /var/www/clientxcms
git fetch --all --prune
git checkout master
git pull origin master
- Put your application in maintenance mode:
php artisan down
- Install dependencies and run migrations:
composer install --optimize-autoloader --no-dev
php artisan migrate --seed && php artisan clientxcms:db-extension --all
- Clear caches and rebuild assets:
php artisan cache:clear
php artisan view:clear
php artisan route:clear
npm install && npm run build
- Exit maintenance mode and run post-update hooks:
php artisan up
php artisan clientxcms:on-update
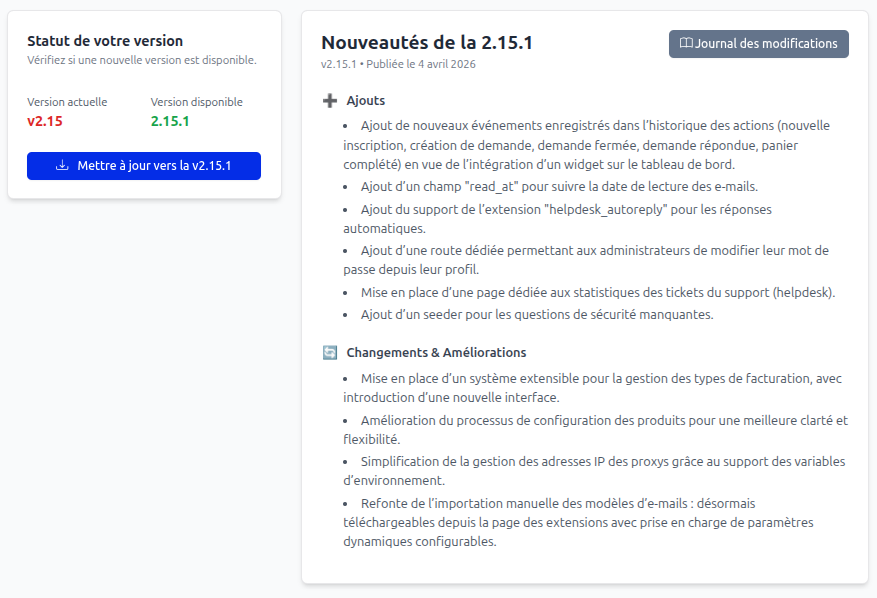
- Log in to your administration interface.
- Go to Settings > Security > Update.
- Click the update button to launch the automatic process.
- Rebuild the assets:
- Run the command
npm install && npm run build.
- Run the command
Plesk
If you use Plesk and installed the application via the Laravel Toolkit, you can follow these steps:
- Log in to your Plesk panel.
- Go to the Git repository manager.
- Update the Git repository with the new version by clicking the "Deploy Now" button.
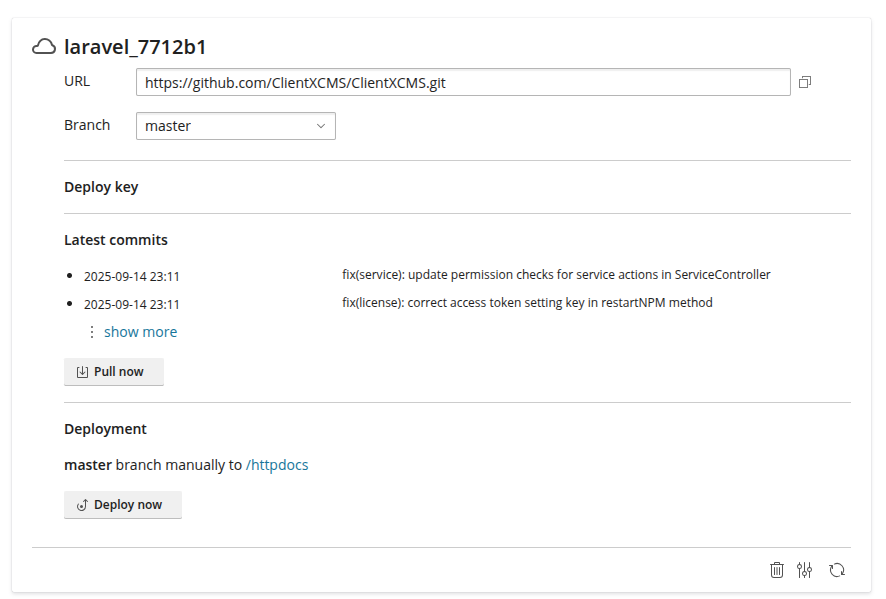
- Follow steps 3 to 5 of the Git update method above using the Laravel Toolkit interface.