Departments
In CLIENTXCMS, departments form the backbone of your help center organization. The goal is organizational: structure support by specialties, efficiently route requests, and optimize each team's expertise. A well-designed departmental organization accelerates resolutions, improves response quality, and enables targeted skill development.
Departments allow automatic categorization of tickets based on their nature and routing them to the right teams.
You can manage departments from:
Settings > Help Center > Departments
Well-organized departments transform the chaos of requests into a structured workflow. Each client is directed to the most qualified expert for their problem.
Why Organize into Departments?
Departmental structuring is essential for:
- Specializing teams according to their skills
- Accelerating resolutions through targeted expertise
- Improving satisfaction with more precise answers
- Optimizing workload between teams
- Facilitating tracking of metrics by domain
It's like organizing a hospital into specialized units 🏥 — cardiology, pediatrics, emergency... each patient goes to the right place on the first try.
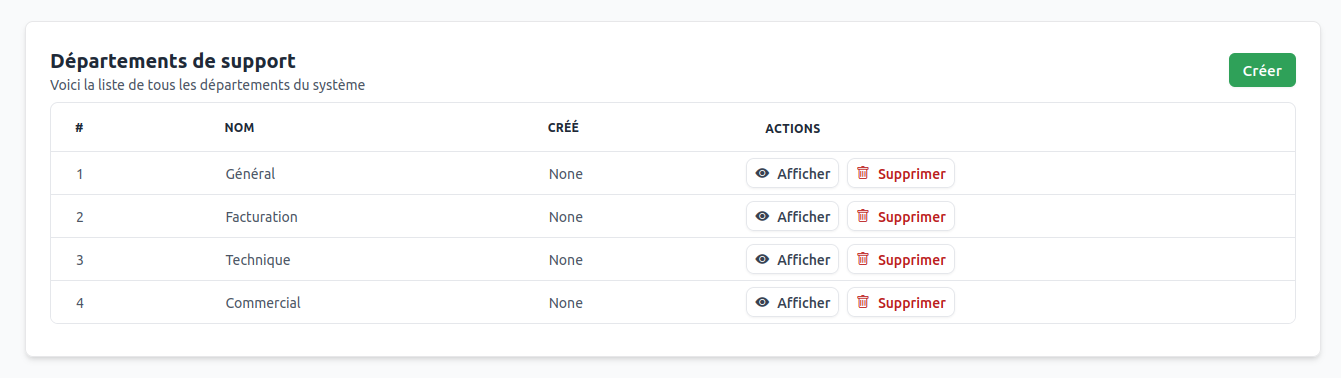
Default Departments
Initial Configuration
CLIENTXCMS offers a standard departmental structure to get started quickly:
| Department | Use | Required Expertise |
|---|---|---|
| 🔧Technical | Server problems, bugs, configurations | IT, development |
| 💰Billing | Invoices, payments, refunds | Accounting, sales |
| 🏢Sales | Sales, quotes, negotiations | Business, customer relations |
| 📋General | Various requests, information | General support |
Adapting to Your Business
These default departments can be:
- Modified: Name, icon, description changes
- Deleted: If not relevant to your business
- Supplemented: Addition of specific departments
Examples of adaptations:
Web Host
- 🔧 Technical: Servers, DNS, SSL
- 💰 Billing: Payments, renewals
- 🚀 Migration: Site transfers
- 📈 Sales: New offers
Development Agency
- 💻 Development: Bugs, new features
- 🎨 Design: Interface, UX/UI
- 📋 Project: Planning, specifications
- 💰 Billing: Quotes, payments
Creating a Department
Creation Process
To add a new department:
- Click "Create" in the top right
- Fill in department information
- Configure visual appearance
- Save the configuration
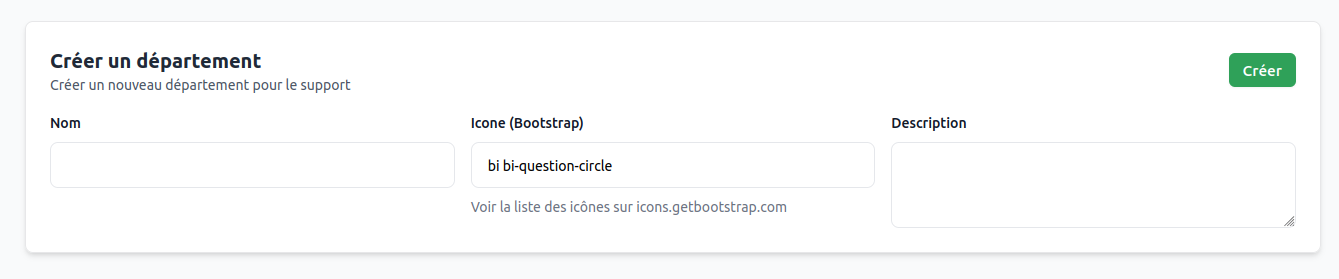
Department Configuration
Name | (text) The name displayed in the client and administrator interface. Use a clear and immediately understandable term.
Examples of effective names:
- ✅ "Technical Support" rather than "Tech"
- ✅ "Billing & Payments" rather than "Accounting"
- ✅ "Sales Assistance" rather than "Sales"
Icon | (icon selector) Visual representation of the department for quick identification.
Description | (long text) Detailed explanation of the type of requests handled by this department. Helps clients choose the right department.
Example description for "Technical Support":
Technical problems, server outages, configurations, site errors,
DNS questions, SSL certificates, performance and optimizations.
Client Interface
Department Selection
When creating a ticket, clients see all available departments:
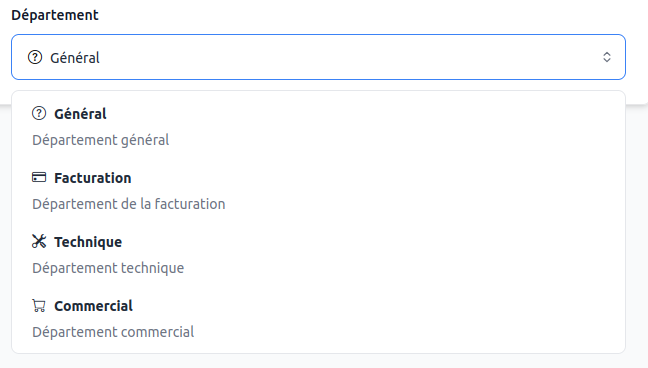
The display includes:
- Department icon
- Descriptive name
- Description to help with choice
Automatic Pre-selection
You can automatically direct clients to a department via URL parameters:
Available Parameters
| Parameter | Description | Example Value |
|---|---|---|
department | Department ID | 1 (Technical) |
priority | Ticket priority | low, medium, high |
subject | Pre-filled subject | Connection problem |
content | Pre-filled message | Hello, I have a problem with... |
related_id | Related service | 123 (Service ID) |
Pre-configured URL Examples
- Technical support with context
- Billing question
- Sales request
https://demo.clientxcms.com/client/support/create?department=1&priority=high&subject=Server+inaccessible
https://demo.clientxcms.com/client/support/create?department=2&related_id=456&subject=Invoice+question
https://demo.clientxcms.com/client/support/create?department=4&content=I+would+like+a+quote+for...
Use these pre-configured URLs for:
- In your emails: insert a direct contextual link to create a pre-filled ticket.
- On your website: help buttons that open ticket creation with the right department/priority.
- In signatures: provide quick access to appropriate support based on message nature.
- Automation: calls from scripts or notifications to open a ticket linked to a specific service.
Tip: properly encode parameters (spaces, special characters) to ensure correct field filling.
Using Pre-configured URLs
- In your emails: Direct links based on context
- On your website: Contextual help buttons
- In signatures: Quick access to support
- In your FAQ: Targeted ticket creation
Department Management
Modifying a Department
To edit an existing department:
- Click "View" in the list
- Modify necessary information
- Adapt translations if needed
- Save changes

Multilingual Translations
Each department can be translated into all enabled languages:
- Language-specific name
- Culturally adapted description
- Consistency with local terminology
Translation access: Icon to the right of each field