Publishing an Addon or Module
Complete the common marketplace publication guide before following this page.
CLIENTXCMS supports two extension types:
- a module delivers and manages a service through a provider such as Pterodactyl, Proxmox, or Plesk;
- an addon adds functionality such as a payment method, business logic, or custom pages.
If the extension has not been created yet, start with Creating an Extension.
Identifier and Extension Type
Choose the same type in the marketplace as in your extension metadata. The marketplace UUID must remain identical across:
- the marketplace resource;
- the directory name,
modules/<uuid>oraddons/<uuid>; - the
uuidvalue inmodule.jsonoraddon.json.
Use a lowercase, URL-safe UUID and keep it unchanged between releases. A mismatch prevents CLIENTXCMS from identifying the package reliably.
Service Providers
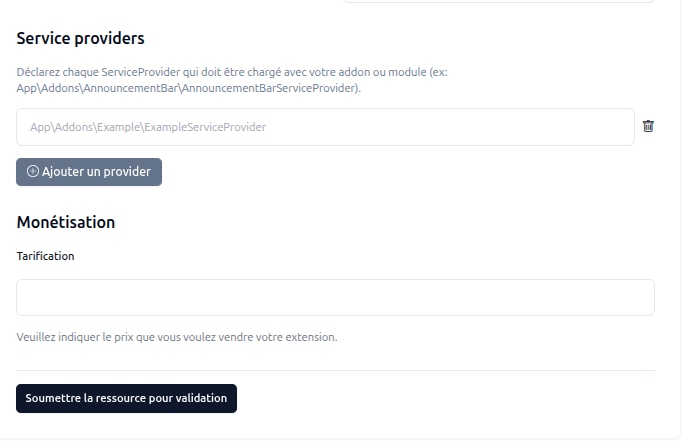
In Service providers, declare every Laravel Service Provider that CLIENTXCMS must load for the addon or module. Enter its complete namespace, for example:
App\Addons\AnnouncementBar\AnnouncementBarServiceProvider
Use Add provider when the extension requires more than one. Each declared class must exist in the submitted archive and respect Composer autoloading and PHP namespace capitalization.
The Pricing field defines the selling price of the extension. Paid pricing is available only to certified developers. You must request certification and confirm that you can issue invoices before CLIENTXCMS can pay out your earnings. Verify your certification and the amount before submitting the resource for validation.
Preparing the GitHub Repository
Use a public GitHub repository to keep the source auditable and the history of every release accessible. The official ClientXCMS Pterodactyl module is the reference layout: its master branch contains modules/pterodactyl, a bilingual README, and versioned GitHub releases.
Recommended module layout:
module-example/
├── modules/
│   └── example/
│       ├── lang/
│       ├── database/
│       ├── routes/
│       ├── src/
│       ├── views/
│       ├── module.json
│       └── composer.json
├── README.md
├── LICENSE
└── .gitignore
For an addon, use the same principle with addons/<uuid> and addon.json.
The README should contain the resource name, purpose, features, requirements, installation and configuration instructions, support link, documentation link, and representative images. Clearly state compatibility and breaking changes.
Do not commit .env files, API keys, panel credentials, customer data, logs, caches, local dependencies, IDE configuration, or files copied from a production installation. Provide .env.example or documented placeholders when configuration examples are necessary.
Publishing an Extension Version
Marketplace versions are created from the CLIENTXCMS developer interface, not by creating a new marketplace listing. Follow Creating a Version to select an existing GitHub release or ask CLIENTXCMS to create the release dynamically from the changelog.
Before opening the version form:
- Update the version in
module.jsonoraddon.jsonand keep it aligned with the version entered in CLIENTXCMS. - Test installation, activation, migrations, configuration, and removal on a clean compatible installation.
- Push the final source to GitHub and ensure the package preserves
modules/<uuid>oraddons/<uuid>at its expected path. - Exclude
.git, development caches, tests not required at runtime, local dependencies, secrets, and installation-specific files. - Open the existing resource in CLIENTXCMS, add the version, associate or dynamically create its GitHub release, complete the categorized changelog, and publish it.
Do not modify an already published version with different code. Publish a new version from CLIENTXCMS so users can identify releases safely.