Proxmox
Proxmox is a popular platform for managing virtual servers and containers quickly and intuitively. This module allows you to automatically create and manage VPS for your customers, according to the resources and performance chosen. You can sell different types of virtual machines or containers, adapted to your customers' needs.
To use the features described below, you must enable the Proxmox module in ClientXCMS.
Supported Features
- Automate VPS creation and provisioning
- VPS management from the client area
- Send login credentials by email
- Proxmox account management per customer
- Automate suspensions and terminations
- Service upgrade
Authentication
ClientXCMS uses the PVE (Proxmox Virtual Environment) API system to ensure a secure and reliable connection with your Proxmox cluster.
Server Configuration Steps
To connect ClientXCMS to your Proxmox server, follow these steps:
1. Enable the Proxmox Module
Make sure the Proxmox module is enabled in ClientXCMS.
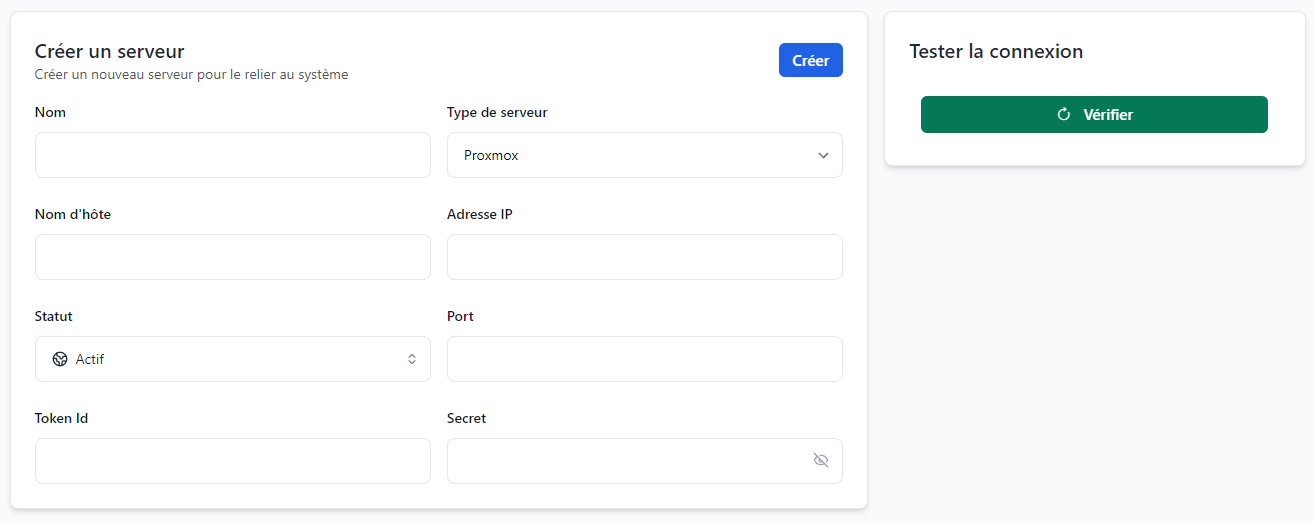
2. Configure a Proxmox Server in ClientXCMS
- Log in to your ClientXCMS administration area.
- Go to Settings > General Settings > Servers.
- Click Create, then select Proxmox as the server type.
Fill in the following information:
- Name: The name you want to assign to the Proxmox server.
- Server Type: Proxmox.
- Hostname: The Proxmox VE hostname.
- IP Address: The Proxmox VE IP address.
- Port: The default port is
8006. If you have configured a proxy with SSL, you can use443or80. - Token ID: The Proxmox token ID for the API.
- Secret: The secret associated with the Proxmox token for the API.
3. Generate an API Token in Proxmox
-
Log in to your Proxmox VE interface.
-
Go to Datacenter (XXX) > Permissions > API Tokens.
-
Click Add to create a new API token.
Fill in the following information:
- User:
root@pam - Token ID: Choose a name for your token, for example
clientxcms. - Privilege Separation: Disable this option by unchecking it.
- User:
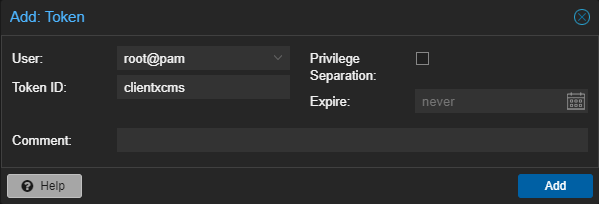
- Click Add to finalize the token creation.
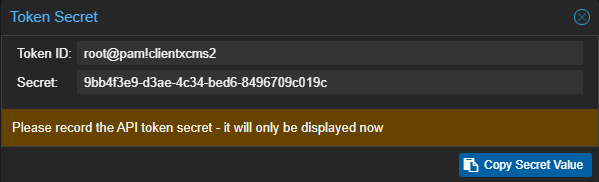
4. Retrieve the Token ID and Secret
In the modal that opens, copy the Token ID and Secret values. This information will be needed when creating the server in ClientXCMS (step 2).
5. Test the Connection
Once the authentication information is entered on the server creation page, click Verify to test the connection. If the returned status is 200 and the message Connection successful appears, you can click Create to add your Proxmox server to ClientXCMS.
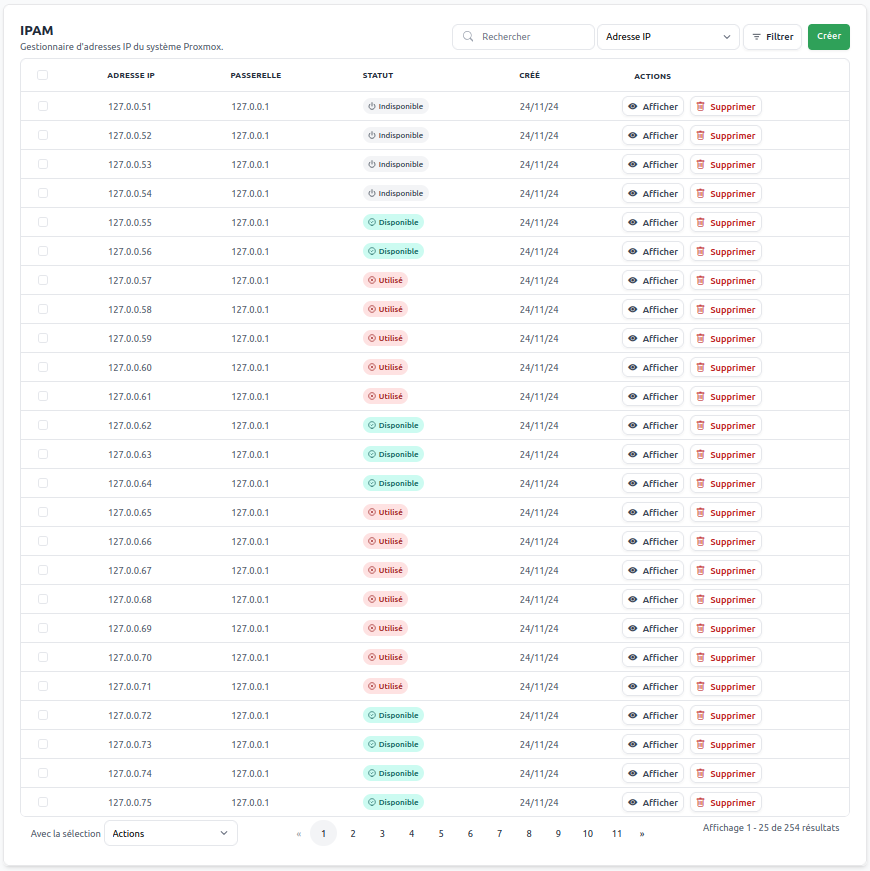
IP Address Import
In ClientXCMS, you can import IP addresses to assign to your customer VPS. To do this, follow these steps:
-
Go to the ClientXCMS administration area.
-
Go to Settings > "Proxmox" Category > "IPAM". You can see a table with the list of IPs you have allocated for your VPS customers, and their status.
-
Click the "Create" button at the top right of the page.
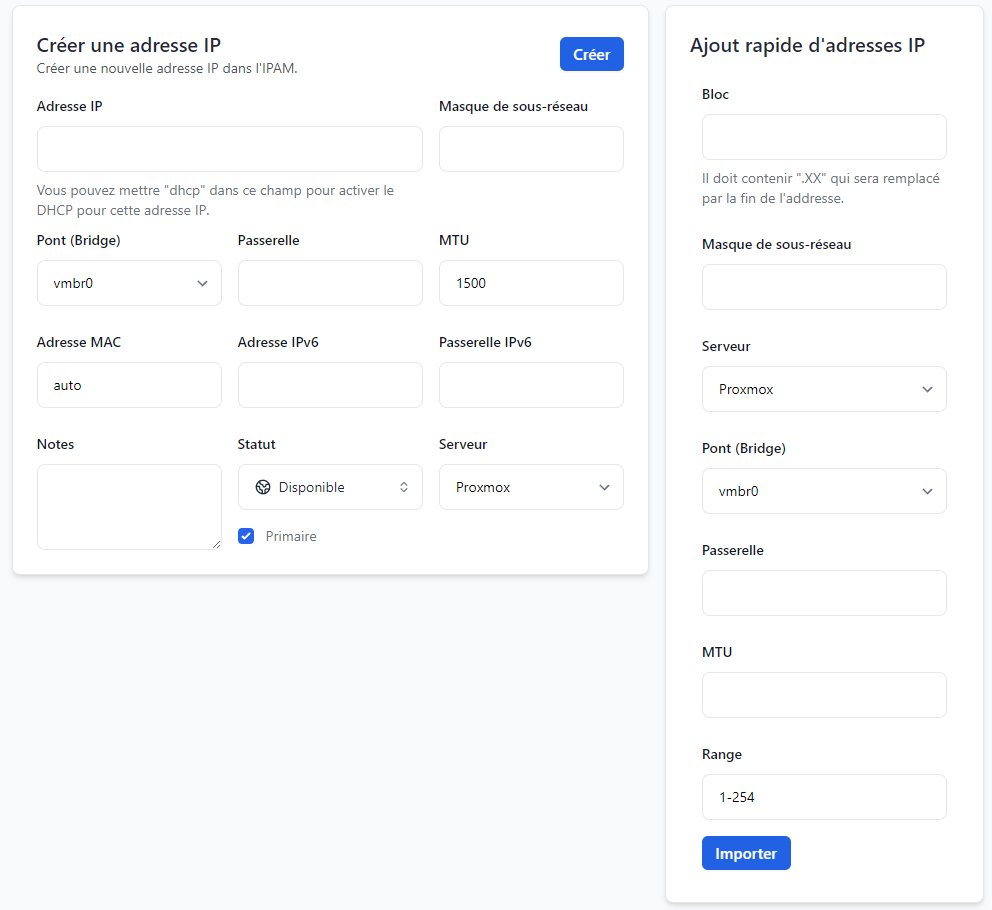
Two import modes are available:
- Create an IP address: Add a single unique IP address.
- Quick IP address addition: Import a range (pool) of successive IP addresses.
Create an IP Address
Fill in the following fields:
- IP Address: IPv4 to add, in
X.X.X.Xformat. - Subnet Mask: Usually
24(corresponds to the CIDR of your network). - Bridge: Bridge identifier in your Proxmox network configuration.
- Gateway: IPv4 of the gateway, in
X.X.X.Yformat (often1or254, depending on your router or network transit configuration). - MTU: Default
1500. Modify this value only if necessary. - MAC Address:
- Default
auto(automatically generated by Proxmox). - Optionally, set a static MAC address if your needs require it.
- Default
- IPv6 Address and IPv6 Gateway: Similar fields for IPv6.
- Notes: Add an annotation to organize your addresses.
- Status: Select the address status: Available, Unavailable, or Used.
- Server: The Proxmox server ID associated with this IP address.
Click "Create" to save the IP address. A confirmation message will appear if the address was imported successfully.
Quick IP Address Addition (range)
To import a block of IP addresses, complete the following fields:
- Block: Enter the IP block in the form
A.B.C.XX. TheXXwill be automatically replaced by the numbers in the defined range. - Subnet Mask: Usually
24(CIDR). - Server: The Proxmox server ID where the addresses will be assigned.
- Bridge: Bridge identifier in your Proxmox network.
- Gateway: IPv4 of the block's gateway, in
X.X.X.Yformat (often1or254). - MTU: Default
1500. Modify this value only if necessary. - Range: The range of IP addresses to add, in the form
A-Z.
Example: To import addresses from
192.168.1.10to192.168.1.199:
- Block:
192.168.1.XX- Range:
10-199
Click "Import" to add the address range.
Operating System Management (for LXC)
If you manage multiple servers (nodes or clusters), make sure the operating system or template is correctly configured on a disk belonging to the Proxmox node of each concerned server.
- Access the ClientXCMS administration area.
- Navigate to Settings > "Proxmox" Category > "Operating Systems".
- Click the "Create" button at the top right of the page.
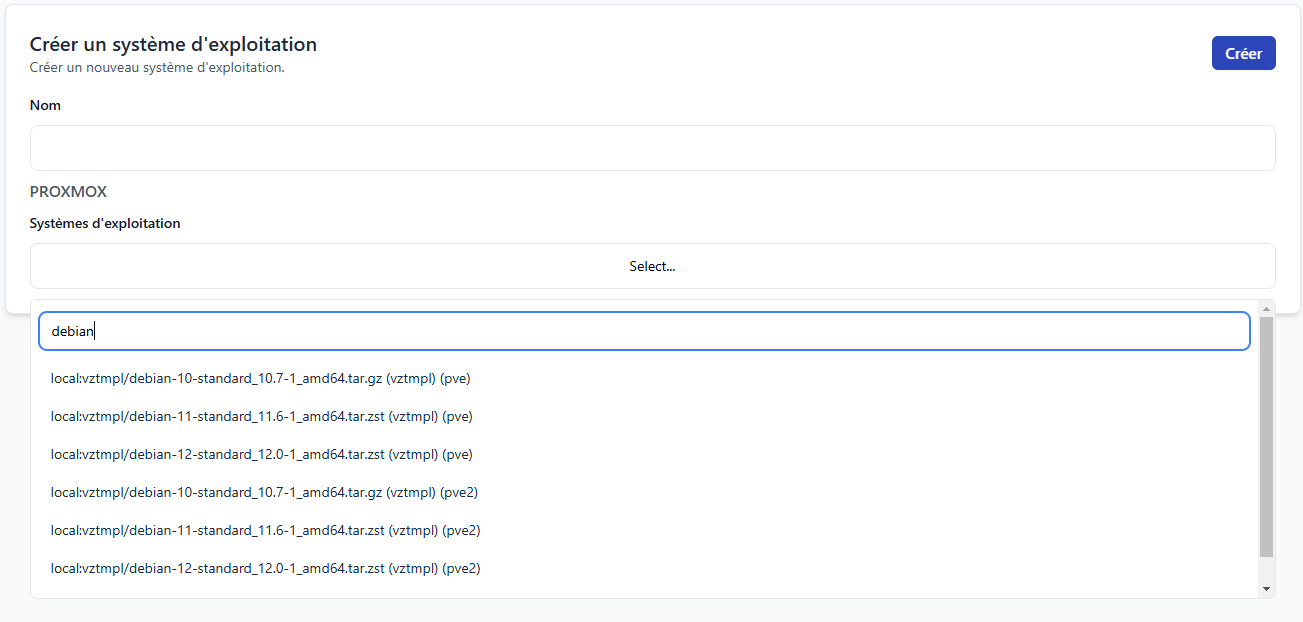
Complete the following fields:
- Name: Operating system name visible when configuring a VPS (example: Debian 12).
- Operating Systems: Container template (CT) identifier located on the server disks.
Once the information is filled in, click the "Create" button. A confirmation message will appear if the operation was successful.
CloudInit Template Management (for KVM)
- Access the ClientXCMS administration area.
- Navigate to Settings > "Proxmox" Category > "Templates".
- Click the "Create" button at the top right of the page.
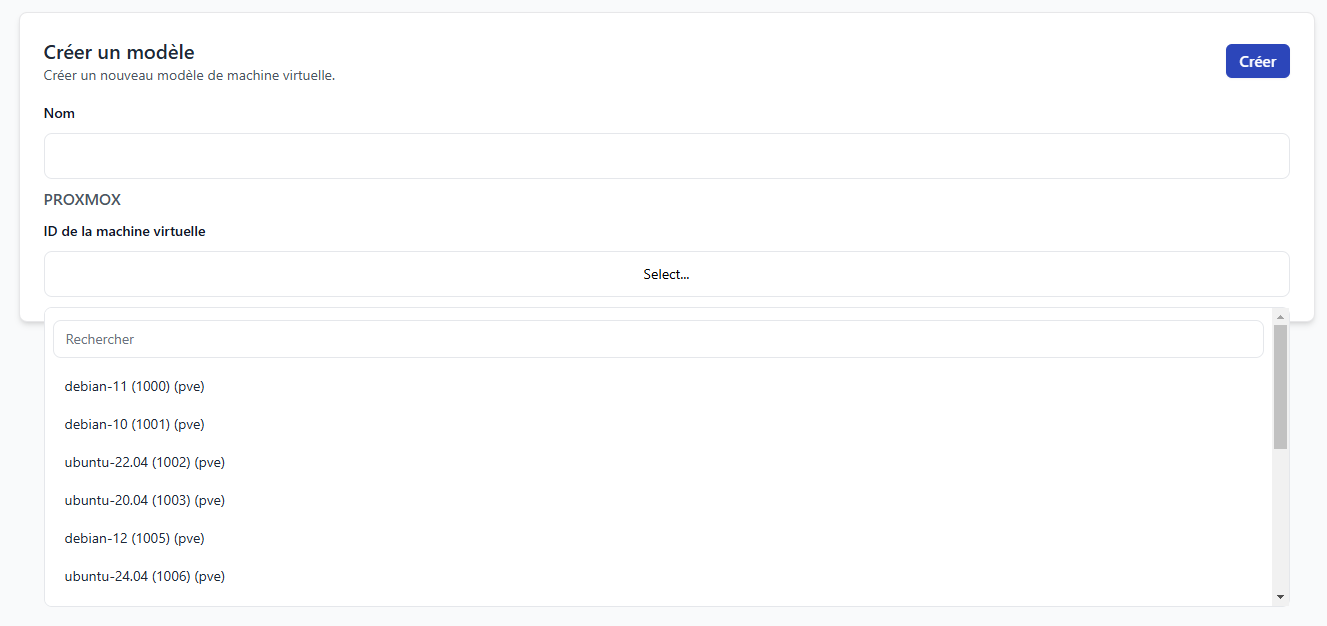
Complete the following fields:
- Name: Template name that will appear when configuring a VPS (example: Windows Server 2025).
- Virtual Machine ID: VM identifier used as a template on the different Proxmox VE nodes.
Then click "Create". You will receive a confirmation if the template was added successfully.
Don't forget to integrate the operating systems and templates into your Proxmox product configuration. This ensures they will be available to your customers when ordering.
Offer Configuration
First, create your product by selecting Proxmox.
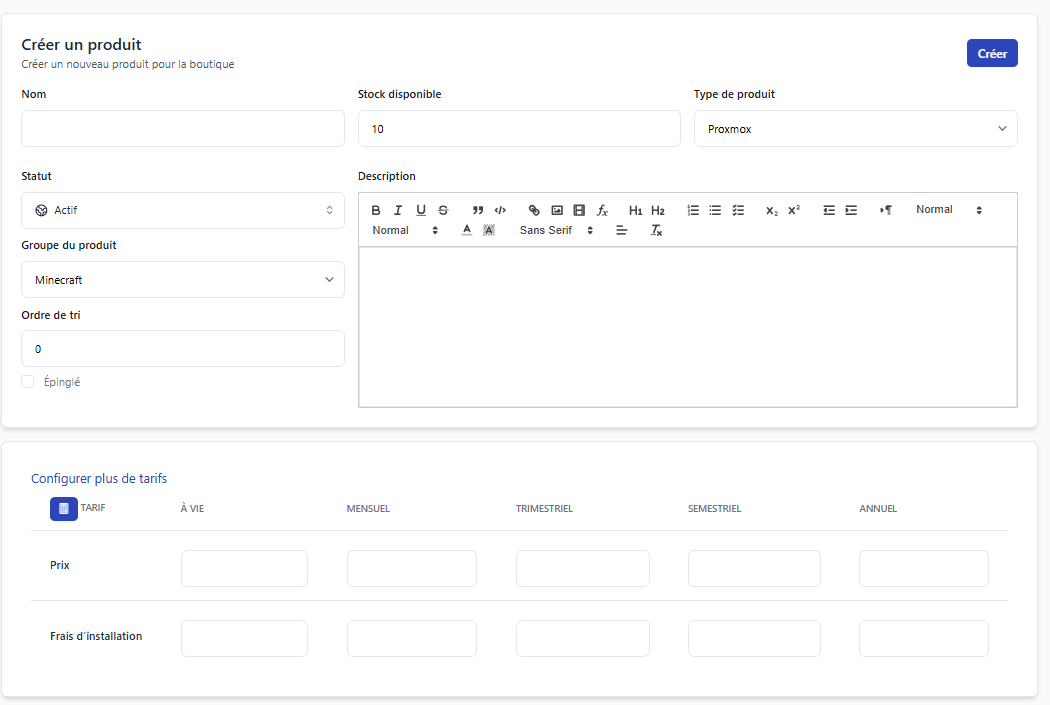
After creating your product, click the "Configure Offer" button to access the offer configuration page. If the fields are empty, make sure your server is not hidden.
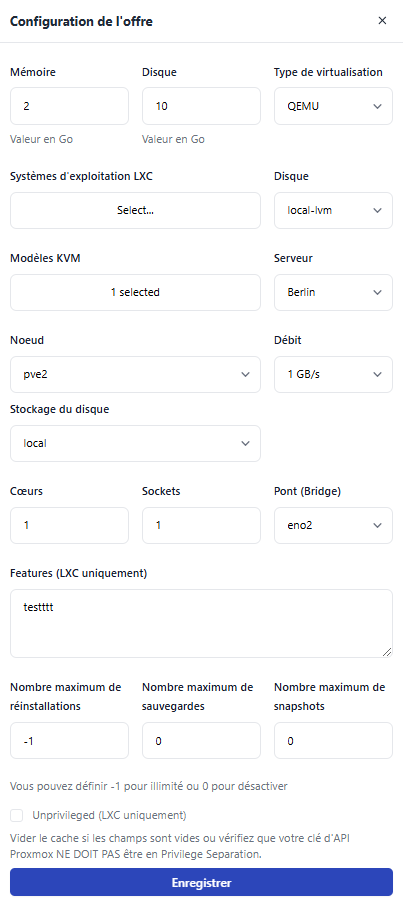 Memory (GB): Total amount of allocated RAM memory.
Disk (GB): Total allocated disk space.
Virtualization Type: Type of virtualization used for VPS. (QEMU (KVM) or LXC)
Operating System: Select the operating system to use for VPS for LXC.
KVM Template: Select the CloudInit template to use for VPS for KVM.
Disk: Storage allocated for the VPS.
Server: Proxmox server configured on ClientXCMS where VPS will be hosted.
Node: Proxmox node on which the VPS will be created.
Bandwidth: Network connection bandwidth allocated to the VPS.
Disk Storage: Storage allocated for the VPS disk. (often the same as disk)
Cores: Number of allocated CPU cores.
Socket: Number of allocated CPU sockets.
Bridge: Network bridge used to connect the VPS to the network.
Features: Additional features enabled for the VPS. (LXC only)
Number of Reinstallations: Number of reinstallations allowed for the VPS.
Number of Backups: Number of backups allowed for the VPS.
Number of Snapshots: Number of snapshots allowed for the VPS.
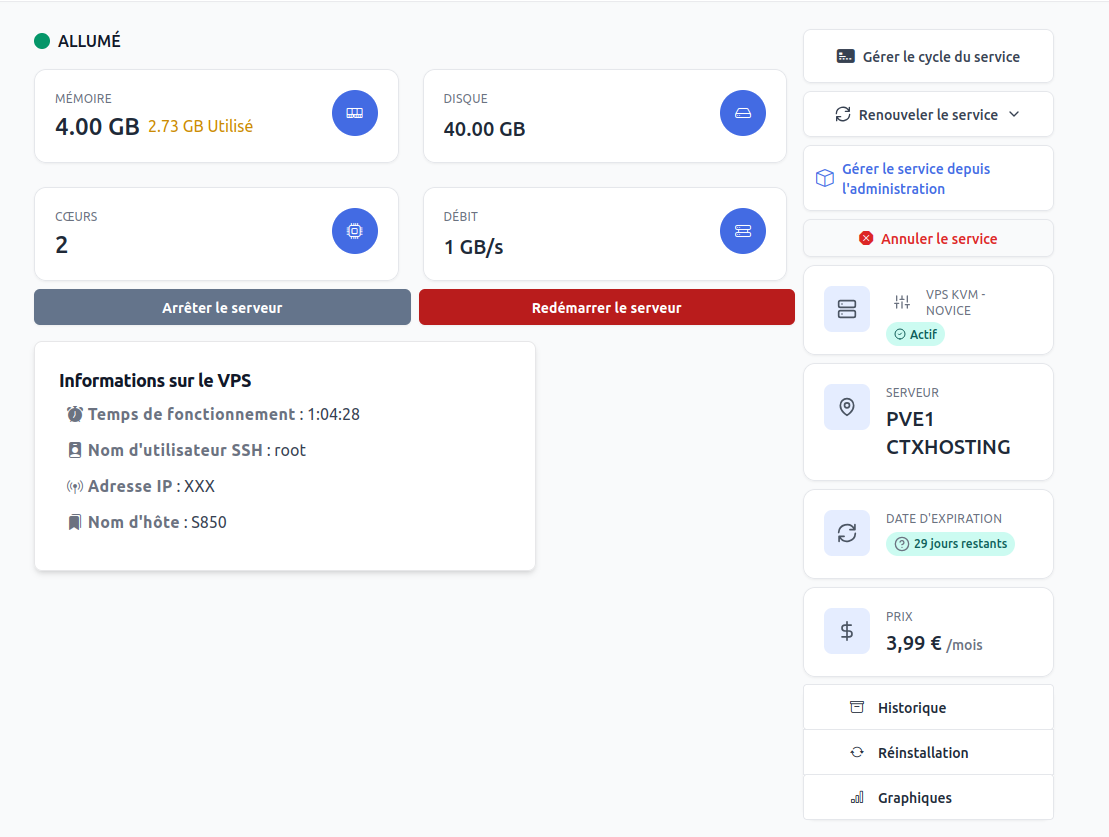
Management Panel
- VPS Management
- New Order
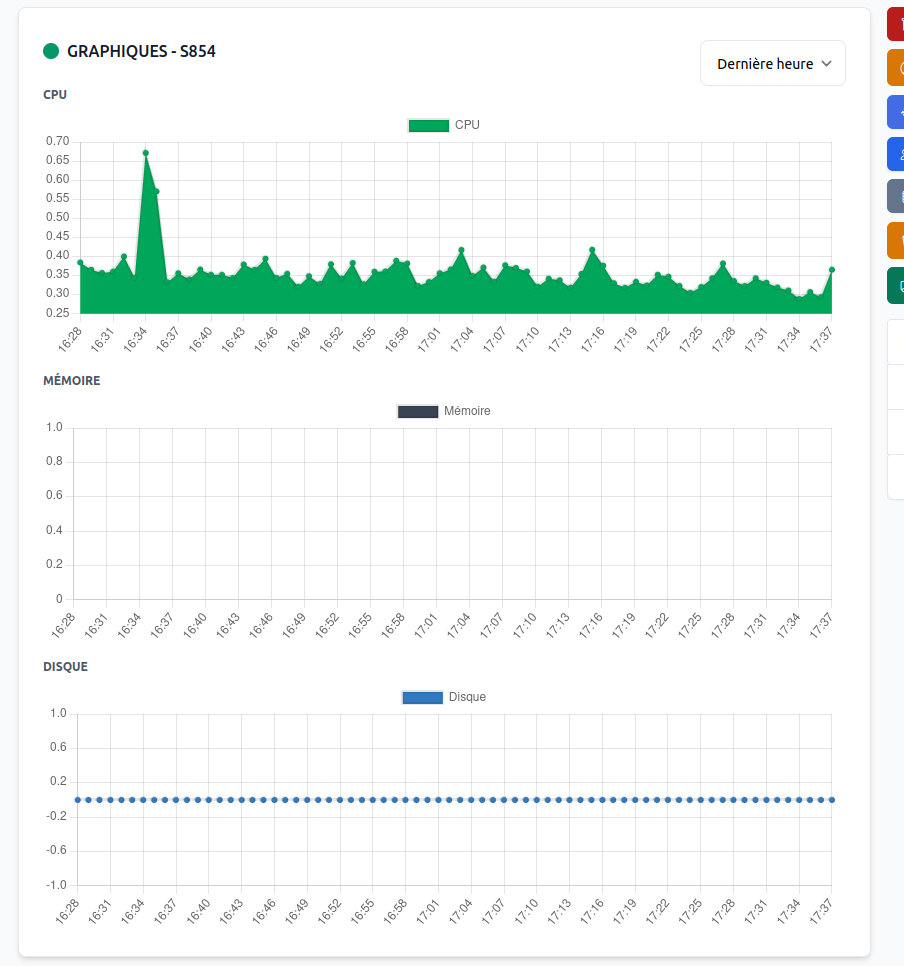
- Graph
- History


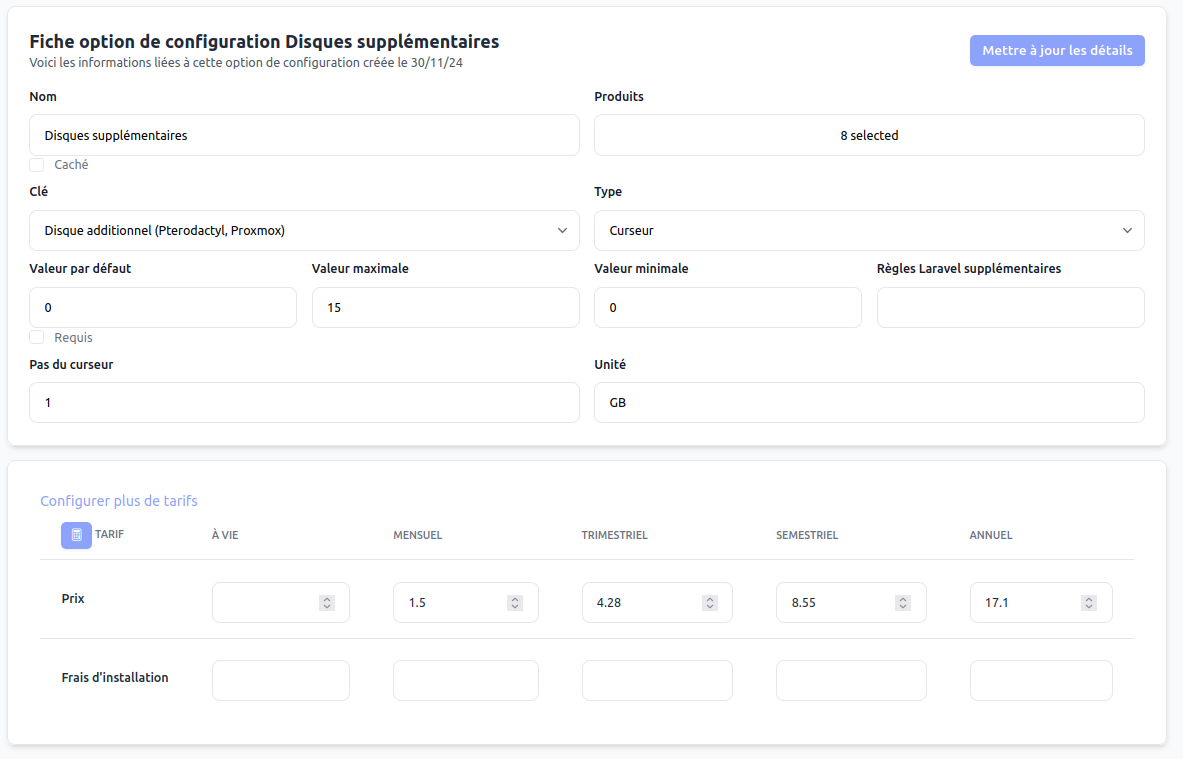
Supported Options
- Additional disk space (sliders or dropdown menu)
- Additional IP addresses (sliders or dropdown menu)
- Additional RAM memory (sliders or dropdown menu)
- Additional CPU cores (sliders or dropdown menu)
- Additional CPU sockets (sliders or dropdown menu)
- Custom network bandwidth (dropdown menu)
- Custom Proxmox node (dropdown menu)
Dropdown menus allow you to define predefined values for resources with a price for each value, while sliders allow you to define custom values based on a unit price. More information on option configuration is available in the additional options documentation.
Configuration Example
Additional Disk Space
Custom Proxmox Node
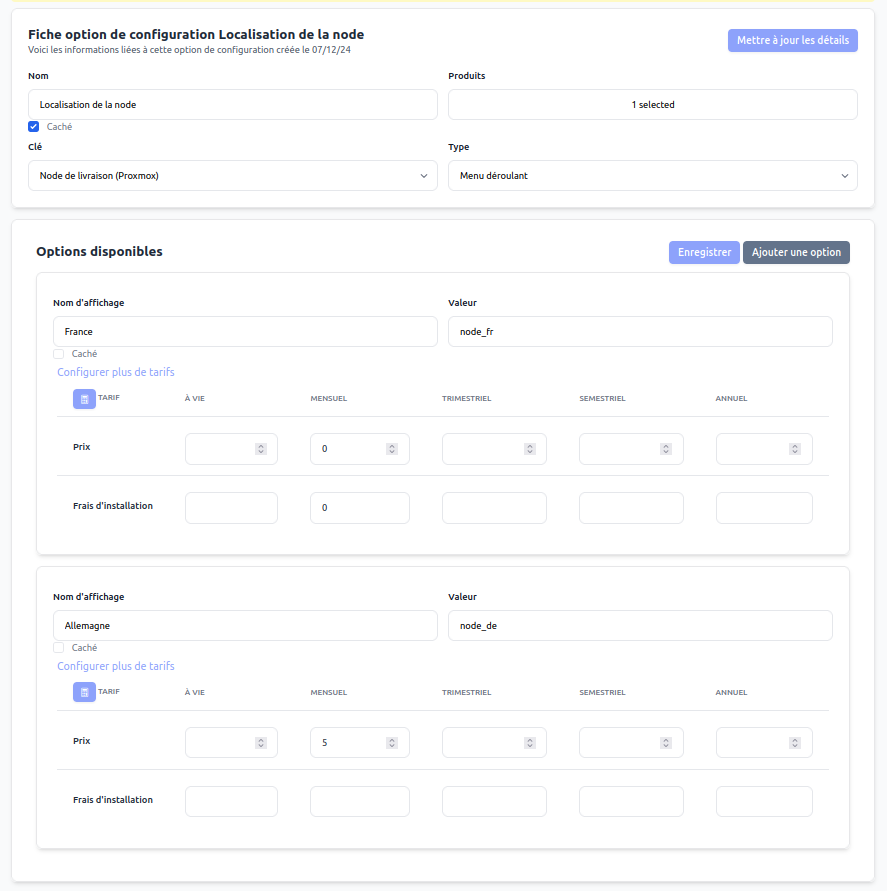
This configuration allows selecting a specific Proxmox node if, for example, you have a node in another datacenter or another country. Each option can have a different price depending on the selected option.
Additional CPU Cores

This configuration allows selecting the number of additional CPU cores for the VPS.
Metadata Used
| Key | Value | Description |
|---|---|---|
vmid | int | VM ID on Proxmox |
node | string | Proxmox node name |
config | json | VPS configuration during reinstallation |
proxmox_reinstall | bool | Indicates if the VPS needs reinstallation |
type | qemu or lxc | VPS type |
proxmox_need_resize_disk | int | Size to add during an upgrade |
proxmox_need_restart | bool | Shows customer that VPS needs restart |
Common Errors
VPS installation taking too long: Check in history in the proxmox-installation-vps.log file. There should be an error to report to support.
Empty templates or operating systems: This may come from a permission issue with your API key. Make sure you have disabled Privilege Separation on your API token.
No available IPs: This error means you don't have available IP addresses to allocate to a VPS. The system searches for:
- IPs associated with a specific server or node, it will only be available for that same server/node.
- IPs not associated with any server or node (None), it is accessible to everyone.
If no IP is found, this error is returned.
VPS not found (tags): CLIENTXCMS uses a Proxmox tag system (kvm, service-123 for example) to ensure that the VM used is for the correct service. So check on your Proxmox that the VM has the correct tags.
VPS not found (metadata): Check the metadata of your service (vmid, node, config)
VPS not found (resources): CLIENTXCMS cannot retrieve the VPS resources.
Artisan Commands
| Command | Description | Parameters |
|---|---|---|
proxmox:delete-vps | Deletes VPS marked as "deleted" on the Proxmox server. | - |
proxmox:disk-vps | Manages disk for VPS installation. | - |
proxmox:installation-vps | Manages installation of VPS that need to be installed. | - |
proxmox:migrate-config | Migrates Proxmox configuration. | - |
proxmox:process-post-install | Manages post-installation actions for VPS. | - |
proxmox:cleanup-console-users | Cleans up Proxmox console users. | - |
Support NoVNC
To support noVNC, you must create a custom role in Proxmox with the VM.Console permission named "PanelCustomer".
You can define in the Proxmox server metadata on ClientXCMS the key proxmox_url with the value proxmox.example.com if you use a local proxmox to indicate the URL of the proxmox.
Support Backups
To support backups, you must define in the Proxmox server metadata on ClientXCMS the key proxmox_backup_storage with the value of the backup storage to use for VPS. For example, if your backup storage is called "backup", you must define proxmox_backup_storage with the value backup. This will allow ClientXCMS to know which storage to use for VPS backups.